简介
本文将通过一个小项目"OverWeb"来学习Docker技术
本项目未经安全测试,请勿直接部署于公共环境
项目介绍:在网页上使用基于Docker的VNC容器
项目地址:🚀GitHub
成品展示:🚀Bilibili
什么是Docker
维基百科
Docker是一个开放源代码软件项目,让应用程序部署在软件货柜下的工作可以自动化进行,借此在Linux操作系统上,提供一个额外的软件抽象层,以及操作系统层虚拟化的自动管理机制。
Docker利用Linux核心中的资源分离机制,例如cgroups,以及Linux核心名字空间(namespaces),来创建独立的容器(containers)。这可以在单一Linux实体下运作,避免引导一个虚拟机造成的额外负担。Linux核心对名字空间的支持完全隔离了工作环境中应用程序的视野,包括进程树、网络、用户ID与挂载文件系统,而核心的cgroup提供资源隔离,包括CPU、存储器、block I/O与网络。从0.9版本起,Dockers在使用抽象虚拟是经由libvirt的LXC与systemd - nspawn提供界面的基础上,开始包括libcontainer库做为以自己的方式开始直接使用由Linux核心提供的虚拟化的设施,
人话
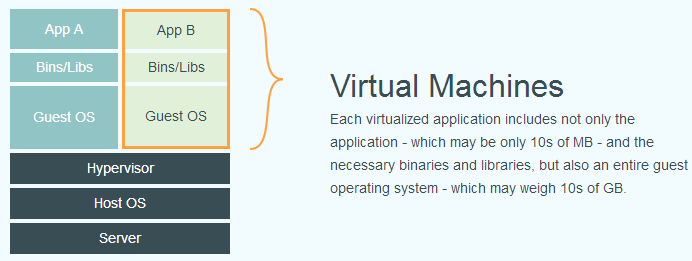
Docker是一个与宿主系统连接更加直接的“虚拟机”。相比传统的虚拟机它不需要再加一层客户操作系统来实现虚拟化,而是通过linux系统的资源分离机制直接实现虚拟的、与宿主隔离的“容器”。
图例(第一张为传统虚拟机,第二张为Docker):


安装Docker
官方网站上有各种环境下的安装指南,这里主要介绍 Docker CE 在 Ubuntu 、Windows 10 (PC) 和 macOS 上的安装。
Docker的版本
Docker 分为 CE 和 EE 两大版本。CE 即社区版(免费,支持周期 7 个月),EE 即企业版,强调安全,付费使用,支持周期 24 个月。
Docker CE 分为 stable, test, 和 nightly 三个更新频道。每六个月发布一个 stable 版本 (18.09, 19.03, 19.09…)。
Ubuntu
使用脚本自动安装
在测试或开发环境中 Docker 官方为了简化安装流程,提供了一套便捷的安装脚本,Ubuntu 系统上可以使用这套脚本安装:
1
2
3
4
5
| curl -fsSL get.docker.com -o get-docker.sh
sudo sh get-docker.sh # 国内用户可加上--mirror Aliyun
sudo usermod -aG docker 你的用户名
# 重启你的电脑
docker run hello-world # 完成!
|
手动安装
删除旧版本
1
| sudo apt-get remove docker docker-engine docker.io containerd runc
|
设置好REPOSITORY
 1
 2
 3
 4
 5
 6
 7
 8
 9
10
11
12
13
14
15
16
17
| sudo apt-get update
sudo apt-get install \
apt-transport-https \
ca-certificates \
curl \
gnupg-agent \
software-properties-common
curl -fsSL https://download.docker.com/linux/ubuntu/gpg | sudo apt-key add -
sudo add-apt-repository \
"deb [arch=amd64] https://download.docker.com/linux/ubuntu \
$(lsb_release -cs) \
stable" # arch处填写你自己的架构
sudo apt-get update
sudo apt-get install docker-ce docker-ce-cli containerd.io
sudo usermod -aG docker 你的用户名
# 重启你的电脑
docker run hello-world # 完成!
|
Windows 10 (PC)
点此下载Community Edition (CE) of Docker for Microsoft Windows
macOS
点此下载Community Edition (CE) of Docker Desktop for Mac
使用Docker
获取镜像
Docker根据一个“镜像”来生成一个容器,这些镜像一般可以在Docker Hub上找到,接下来我们将来获取这些镜像
1
| docker pull [选项] [Docker仓库 地址[:端口号]/]镜像名[:标签]
|
具体的选项可以通过 docker pull –help 命令看到
Docker仓库:地址的格式一般是 <域名/IP>[:端口号]。默认地址是 Docker Hub。
镜像名:如之前所说,这里的仓库名是两段式名称,即 <用户名>/<镜像名>。对于 Docker Hub,如果不给出用户名,则默认为 library,也就是官方镜像。
实操
1
2
3
4
5
6
7
8
9
| docker pull ubuntu:18.04
# 18.04: Pulling from library/ubuntu
# bf5d46315322: Pull complete
# 9f13e0ac480c: Pull complete
# e8988b5b3097: Pull complete
# 40af181810e7: Pull complete
# e6f7c7e5c03e: Pull complete
# Digest: sha256:147913621d9cdea08853f6ba9116c2e27a3ceffecf3b492983ae97c3d643fbbe
# Status: Downloaded newer image for ubuntu:18.04
|
使用镜像 -> 容器
主要命令 docker run
1
2
| docker run ubuntu:18.04 /bin/echo 'Hello world'
# Hello world
|
这时发生了什么:
1.Docker根据你给出的镜像名ubuntu:18.04创建出一个容器
2.Docker向刚刚创建的容器传入你输入的命令/bin/echo ‘Hello world’
3.Docker将容器的输出返回
更多用法
Docker的玩法当然远不止这些,不过篇幅所限(懒),给大家推荐一个Docker教程——Docker —— 从入门到实践
Docker的小实践 -> OverWeb
OverWeb简介
在网页上使用基于Docker的VNC容器
OverWeb的架构

OverWeb的文件结构
 1
 2
 3
 4
 5
 6
 7
 8
 9
10
11
12
13
14
15
16
17
18
19
20
21
22
23
24
25
26
27
28
29
30
31
32
33
34
35
36
37
38
39
40
41
42
43
44
45
46
47
48
49
50
51
52
53
54
| $ tree
.
├── LICENSE
├── README.md
├── main.py
├── static
│ ├── css
│ │ ├── mdui.css
│ │ ├── mdui.min.css
│ │ └── mdui.min.css.map
│ ├── fonts
│ │ └── roboto
│ │ ├── LICENSE.txt
│ │ ├── Roboto-Black.woff
│ │ ├── Roboto-Black.woff2
│ │ ├── Roboto-BlackItalic.woff
│ │ ├── Roboto-BlackItalic.woff2
│ │ ├── Roboto-Bold.woff
│ │ ├── Roboto-Bold.woff2
│ │ ├── Roboto-BoldItalic.woff
│ │ ├── Roboto-BoldItalic.woff2
│ │ ├── Roboto-Light.woff
│ │ ├── Roboto-Light.woff2
│ │ ├── Roboto-LightItalic.woff
│ │ ├── Roboto-LightItalic.woff2
│ │ ├── Roboto-Medium.woff
│ │ ├── Roboto-Medium.woff2
│ │ ├── Roboto-MediumItalic.woff
│ │ ├── Roboto-MediumItalic.woff2
│ │ ├── Roboto-Regular.woff
│ │ ├── Roboto-Regular.woff2
│ │ ├── Roboto-RegularItalic.woff
│ │ ├── Roboto-RegularItalic.woff2
│ │ ├── Roboto-Thin.woff
│ │ ├── Roboto-Thin.woff2
│ │ ├── Roboto-ThinItalic.woff
│ │ └── Roboto-ThinItalic.woff2
│ ├── icons
│ │ ├── favicon.ico
│ │ └── material-icons
│ │ ├── LICENSE.txt
│ │ ├── MaterialIcons-Regular.ijmap
│ │ ├── MaterialIcons-Regular.woff
│ │ └── MaterialIcons-Regular.woff2
│ └── js
│ ├── mdui.js
│ ├── mdui.min.js
│ └── mdui.min.js.map
└── templates
├── about.html
├── go.html
└── index.html
8 directories, 42 files
|
安装&运行
1
2
3
4
5
6
| # 需要Docker以及Python3环境
git clone https://github.com/DreamWalkerXZ/OverWeb.git
cd ./OverWeb
docker pull consol/ubuntu-icewm-vnc
pip3 install flask --user
python3 main.py
|
关键部分
1
| os.system('docker run -d -p %d:6901 -e VNC_PW=%s -e VNC_RESOLUTION=720x720 --name %s consol/ubuntu-icewm-vnc chromium-browser https://www.google.com/' % (port, password, name))
|
-p参数(用于端口映射) -p 映射至宿主机的端口:容器内要映射的端口
-e参数(用于设置容器内的环境变量) -e ENV1=VALUE1 ENV2=VALUE2
–name参数(用于为容器命名) –name NAME
主程序
 1
 2
 3
 4
 5
 6
 7
 8
 9
10
11
12
13
14
15
16
17
18
19
20
21
22
23
24
25
26
27
28
29
30
31
32
33
34
35
36
37
38
39
40
41
42
43
44
45
| import os
import time
import uuid
import random
import threading
from flask import Flask, render_template, url_for
app = Flask(__name__)
def expireContainer(name):
print('%s will be removed in 10 minutes' % (name))
time.sleep(10*60)
print('Stopping %s' % (name))
os.system('docker stop %s' % (name))
print('Removing %s' % (name))
os.system('docker rm %s' % (name))
def createTmpContainer(port, password, name):
print('Creating %s' % (name))
os.system('docker run -d -p %d:6901 -e VNC_PW=%s -e VNC_RESOLUTION=720x720 --name %s consol/ubuntu-icewm-vnc chromium-browser https://www.google.com/' % (port, password, name))
threading.Thread(target=expireContainer, args=(name,)).start()
@app.route('/')
def index():
return render_template('index.html')
@app.route('/go')
def go():
port = 10000 + random.randint(0, 50000)
password = str(uuid.uuid4())
name = str(uuid.uuid4())
createTmpContainer(port, password, name)
return render_template('go.html', link='http://localhost:%d/?password=%s' % (port, password))
@app.route('/about')
def about():
return render_template('about.html')
def main():
app.run(host='127.0.0.1', port=8080, debug=True)
if __name__ == '__main__':
main()
|


